To use Custom Reports your product registration key must include the Report (R) add-on module as an option.
This
task requires:
- BIRT designer knowledge.
- BIRT must be installed using the proper version of Eclipse.exe available in the Customer Portal.
- Java SE Development Kit 8u66 - Download jdk-8u66-windows-x64.exe
- Access to the System page
- Reports Authority granted - Setup > System > Authority Levels
- View Roster granted - Setup > Security > Authority
| Important |
|---|
| BIRT contains four templates readily available Assignment.rptdesign, Multiday.rptdesign, blank.rptdesign and Position_ClosureNotes.rptdesign1 template. The blank templates may be used for any of the canned reports such as the Accrual report, Audit report, and so on. Only the Assignment, Multiday, and Position Closure Notes reports have a predefined data source template. If you choose to customize the Audit report, as an example, you will see a blank template with Audit data sources available to further customize. |
Follow the steps in the order shown below to create and run a single custom BIRT report:
- Launch the BIRT application. Click birt.exe located in the birt designer after it is installed.
- Go to System > Custom Reports
- Click Add, to create a new custom report.
- In Name, label the report.
- In Report Type, select BIRT Report.
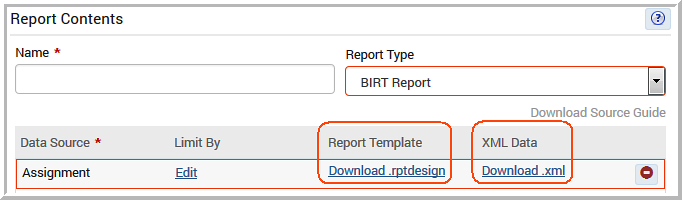
- In Data Source, click Add to open the Report
Data panel.
- Download the XML Data, ‘Download.xml’, and save this
file in the ...resources > data folder of your birt designer.
This xml file will render this report in the birt-designer using
your database information when previewing this report in BIRT. For example,
the default path is: C:\birt-designer\birt\src\main\resources\data
To view all of the field items available within the selected report(s) open the corresponding Download.xml file.
- Download the XML Data, ‘Download.xml’, and save this
file in the ...resources > data folder of your birt designer.
This xml file will render this report in the birt-designer using
your database information when previewing this report in BIRT. For example,
the default path is: C:\birt-designer\birt\src\main\resources\data
- Supply dynamic dates in the Dynamic Dates panel. For example, TODAY, TODAY+7days, TODAY-1day. Doing so will auto populate the From and Through fields for this report when generated by users in the Reports area. Common practice, set both fields to TODAY. The user can change the From and Through parameters as desired in the Reports area.2
- Click Save to embed the default date in your .rptdesign template(s).
- Click Download.rpt.design to obtain the template of the selected report. This is the data source template you will need to further modify in BIRT. This is the layout of the report which includes any data limits and the dynamic dates supplied, if any. Save this file in the resources folder of your birt-designer. For example: C:\birt-designer\birt\src\main\resources
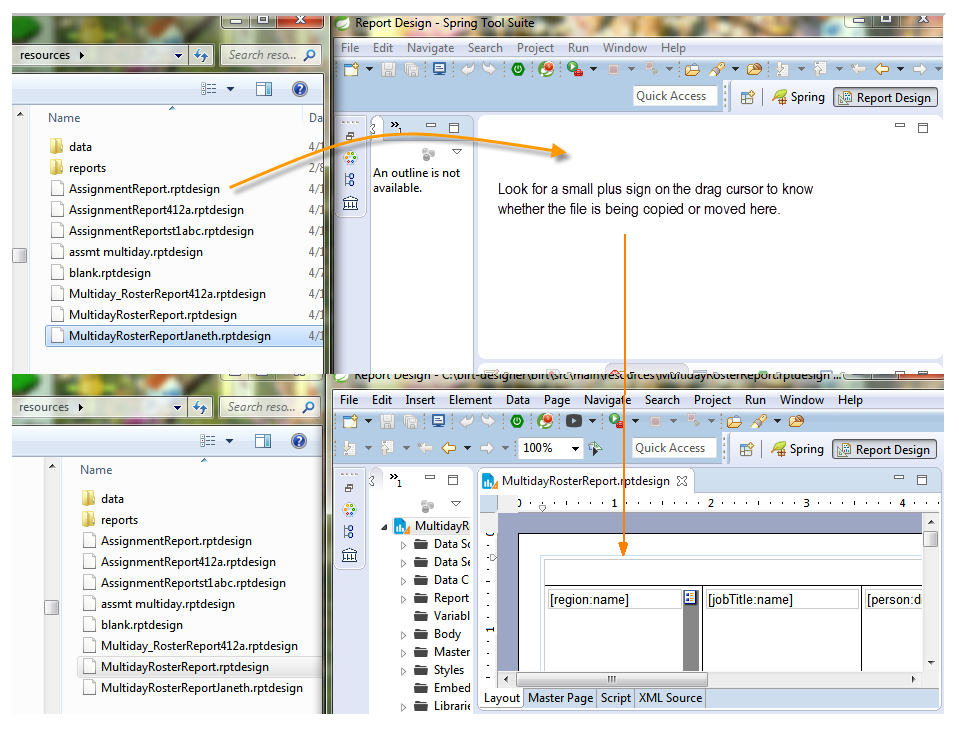
- Access your birt-designer, it should already be open
per Step 1 of this task. Locate the file you want to modify in the
resources folder. Drag the desired .rptdesignfile in to the birt-designer
workspace and customize as desired. For example, you may add a header,
format the font, add borders, highlight, add text, remove data,
add new data by dragging and dropping new data sets into the file.
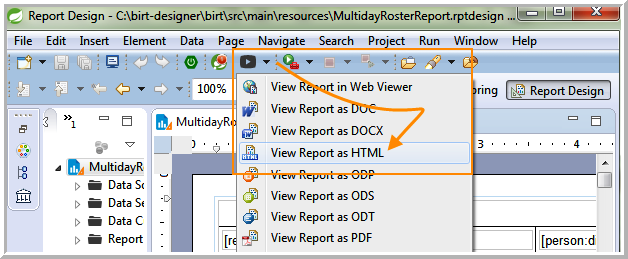
- Save your new template in the resources folder. To preview
the report. Go to the tool bar, and click the Play button to show
additional menu options and select View Report as HTML.
- Upload this new template in the Upload Custom Template area of the application.
- In Custom Template, select the check box next to Run/download report immediately to view and test your report upon upload. Optional step, however recommended.
- If you modify the template, save it, and upload it again. Repeat these steps until the report is ready.
- Click Save to save the most recent draft.
- Click Publish to share the report with others and make the report accessible in the Reports area.