Configure Workforce Ready Time Entry Export Settings

Workforce Ready integration settings must be configured prior to setting the Workforce Ready Time Entry Export Settings. Review topics:
  • Workforce Ready Integration
  • About Workforce Ready Timesheet Entries
  • Planning and Configuring Cost Centers

It is very important to understand the entire procedure to correctly configure both applications prior to the integration in all use cases. As such, careful consideration between WFR cost centers and staffing record data in this application is required to proceed without issues.

The Roster to Workforce Ready Time Entry Export Settings are used to map roster time and labor entries from this application to WFR cost centers for the purposes of feeding and automatically populating WFR employee timesheets1 or schedules2.

To configure web services between applications and export work code related time entries follow these steps:

  1. To allow this application to feed and populate timesheet entries for an employee in Workforce Ready. Go to Workforce Ready > My Employees > Employee Information > Edit Employee > Timeseet, select Start/End (All Days)
  2. To locate cost centers in Workforce Ready go to Company Settings > Global Setup > Cost Centers. Click a cost center tree to expose the settings. Only these fields require configuration to integrate both applications:
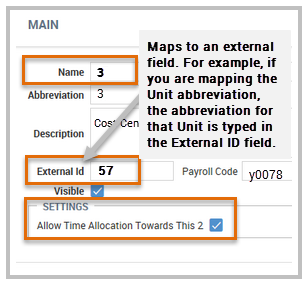
    • Name - the name for the cost center entered here will show on the WFR timesheet Cost Center 1,2,3... column. The Name is for display purposes in WFR.

      WorkforceReadyIntegrationCostCenterMappingExample
    • External ID - this field is a unique link to an external application for integration purposes. An external application could be TeleStaff or Planner. For example suppose you are mapping the Unit abbreviation used in TeleStaff, then the abbreviation for that Unit is typed in the External ID field. Max length: 30 characters.

    • To allow this application to apply time towards the selected cost center tree, select the check box Allow Time Allocation Towards This in Settings.

      Workforce Center IntegrationExternalIDMappingExample
  3. To access integration settings in this application:
    • Version 6+ go to Setup > System > Import Manager > Ongoing Imports > Integration Type choose Workforce Ready.

    • Version 7+ go to Setup > System > Import Manager > Integrations> Integration Type choose Workforce Ready .

  4. In Workforce Ready Time Off to Work Code Mapping section identify and map time-off categories and work codes to be exported. For instance, if you would like to send Vacation to a Workforce Ready time sheet you must map the Vacation Time-Off in Workforce Ready to a vacation non-working work code in this application. See Configure Workforce Ready Code Mapping topic for additional configuration information.
  5. Go to Workforce Ready Time Entry Export Settings.
  6. In the Workforce Ready Employee Field, select the field that will be used to map employees from Workforce Ready to this application. Workforce Ready options are Account ID or Employee ID. If you do not map an employee then time entries for that employee will be blank, and an error will be logged in the activity log.
  7. In the Employee Field, select the employee field that will be used to map employees from this application to Workforce Ready. Options are: Employee ID, External ID, and Payroll ID. These fields are located in the person General tab. If you do not map an employee then time entries for that employee will be blank, and an error will be logged in the activity log.
  8. In Workforce Ready Cost Center there are nine cost center trees available for mapping. You do not need to use all nine cost centers, only the cost centers associated with a Roster time entry require mapping.
  9. For this application choose one of thirty five fields available for mapping. To see which fields are available for mapping review field reference topic: Workforce Ready Roster to Time Entries File Properties.

    The entire export process will fail if any of the applicable cost center trees is not mapped to a field in this application. To view export process details see the activity log in Setup > System > Activity.

  10. Click Save to confirm your settings. To configure the export integration settings go to Setup > System > Task Manager and use task type Workforce Ready Roster Export to Time Entries.

Configure Kerberos Authentication

  • Access to the application’s server
  • Access to the security.properties file.
  • Review About Security Authentication topic.

To enable Kerberos authentication:

  1. Access the application’s security.properties file.

    The default location is C://Program Files > “Application Name”> configuration > security.properties

  2. In security.profiles=SECURITY-WEB3, enter the security profile for Kerberos; for example: security.profiles=SECURITY-KERBEROS.
  3. Optional - To identify multiple profiles enter the desired security profiles; for example:security.profiles=SECURITY-WEB-AD,SECURITY-KERBEROS,SECURITY-WEB

    Note no space after the comma and be sure to set all applicable settings when entering multiple security profiles.

  4. In security.krb5.confLocation, enter the file location of the Kerberos ini file.
  5. In security.krb5.servicePrincipal, enter the service principal (SPN) name for Kerberos authentication.
  6. In security.krb5.keyTabLocation, enter the file location of the Kerberos key tab file.
  7. In security.krb5.debug, TRUE turns on extra debugging information to help track down Kerberos configuration problems. The recommended setting is FALSE.
  8. Save the file to confirm your input.
  9. Stop and Restart the application to initiate your new settings.
Kerberos Directory Sample Settings

security.krb5.confLocation=file://C:/usr/local/apache-tomcat-7.0.63/conf/krb5.ini
security.krb5.servicePrinicipal=HTTP/tsg-nlb05.int.kronos.com
security.krb5.keyTabLocation=
security.krb5.debug=
file://C:/usr/local/apache-tomcat-7.0.63/conf/tsg-nlb05.int.kronos.com.keytabsecurity.krb5.debug=false
1 Available as of application version 6.4.1.
2 Available as of application version 6.6
3 The default security.profiles is SECURITY-WEB.