The task below shows an example of the necessary steps
to generate a position type auction. Configuration requirements
vary across customers and industries. Use the steps below to obtain
a general idea of how to configure a position type auction.
- Bidders List Plan - to create the
list of bidders. Required for both Queue and Preference auctions.
- Win Order List Plan - to process the win order for all Preference
type auctions.
- Optional - Formula IDs to change the default position names.
- See Generate Field Descriptions topic for field definitions.
To configure a basic position type auction:
- Go t o Setup > Bidding > Auction
- Click Add to create a new auction.
- In the Auction screen, configure these fields:
In Name, label the auction.
Enter the Effective Date.
In Bidders, select the Bidders List Plan.
In Win Order, select the Winners List Plan if
this is a Preference auction. Skip this option for a Queue auction
unless instructed to select by a Kronos application expert.
In Bid Method, select Preference or Queue.
Click Save.
- Go to the left pane of the Auction and click Add >
Generate items...
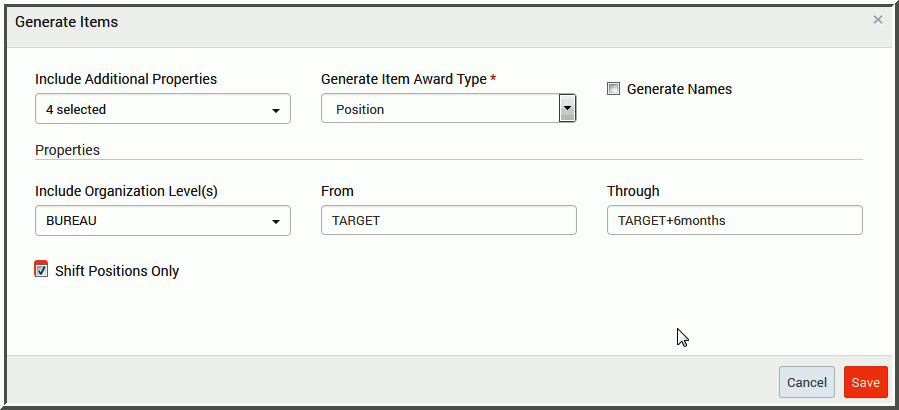
The Generate Items properties window shows. The screen
shows only the required fields for the selected items.
- To start a basic position auction, select the Award
Type: Position. A red asterisk next to the field name
denotes a required field.
| IMPORTANT |
| For this task, populate the fields indicated
below only and use theInclude Additional Properties menu
box to enable the settings if needed. |
- Position base settings are:
In Include Organization Levels - select Stationor
equivalent organizational structure level.
In From, enter the start date of the assignment.
For this example leave the default settingas is.
In Through, enter the end date of the assignment.
For this example leave the default settingas is. Best
Practice: Leave the Throughfield blank and allow the
Bidding module to determine the end date based on the Fromdate supplied
for the next auction.
In Limit Shift, select the Shift or Shifts for
this Auction. If blank, the auction will show all of the shifts.
Select one of the applicable shifts to limit the amount of data
within this test example. Best Practice: Create an auction
for each shift separately. Doing so will show one auction in the
Bidding area for each shift. If multiple shifts are selected the
Auction will show all of the shifts contained - but only the appropriate
shift will enable for the logged in user.
Select Shift Positions Only.
Click Save.
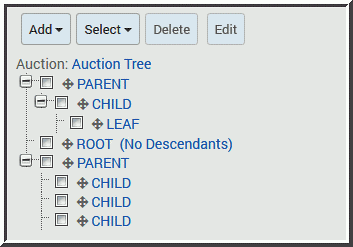
To apply a Formula ID and change the position names,
go to the Auction Items list and select one of the auction items.
- Go to Select > Select All same level to select
only Child items. Doing so will exclude the Parent level from the
Formula ID.
- In the Formula ID menu box, select the applicable Formula
ID.
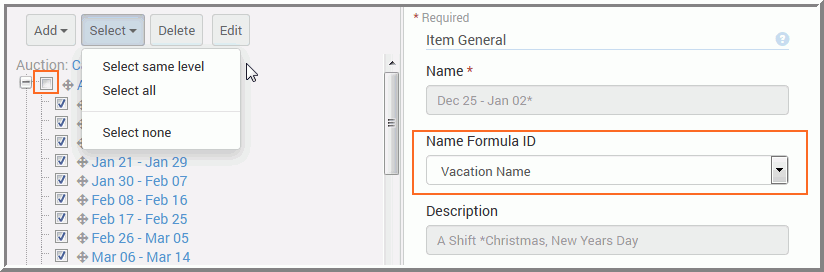
- Click Saveto resolve the Formula IDs. The auction
items will display the new name.
To control the visibility for this Auction, go to the Parent level
in the auction tree.
- In Visible Condition, enter PERSONHASSHIFT.
- Click Save.
To control which items are biddable for this Auction,
go to the Child level in the auction tree.
- Select a Child or an auction item then click Select
> Select all same level to select all applicable auction items.
- In Biddable Condition, the system will auto populate
by default the applicable job title and corresponding Unique Identifier.
To apply the Bidding Plan and make this Auction available
in the Manage Bidding area go to Setup > Bidding > Plan:
- Click Add to create a new plan.
- Label the Plan and assign this auction to the selected
Bidding Plan. Doing so will make this auction available in the Bidding
area.
- Click Save.
The Auction is available in the Bidding area. Click the
Manage link, to navigate to the applicable auction. Go the bidders
list pane. Click the icon that looks like a gear and select Create
bidders list to view the bidders for this auction. Depending
on your settings, you may need to click the Auction button in the
right pane and select Open auction.