Careful consideration, best practices, and use cases must be vetted carefully before designating cost centers to fields in this application.
IMPORTANT INFORMATION: Each cost center can only map to a roster time and labor field in this application once.
Workforce Ready offers nine cost center trees, each and any cost center tree can be used to uniquely pair with one and any of the thirty-five designated fields in this application; for field mapping details see Workforce Ready Roster to Time Entries File Properties.
For example, suppose that you have chosen to map the organizational level of UNIT in this application to Cost Center 1, and special event activities are paid through Cost Center 2. A special event is actually an organizational UNIT deployed on the Roster which encompasses two cost centers in this use case, so which cost center should own the UNIT field?
Whether Cost Center 1 or Cost Center 2 should own the UNIT field depends on your business rules, workflow, given configuration, staffing requirements, other overlaps, and whether or not a different field in this application is a better fit for Cost Center 1 or Cost Center 2. The end result here is to always send a Workforce Ready timesheet data for time records with a cost center association.
Use Cases and Considerations
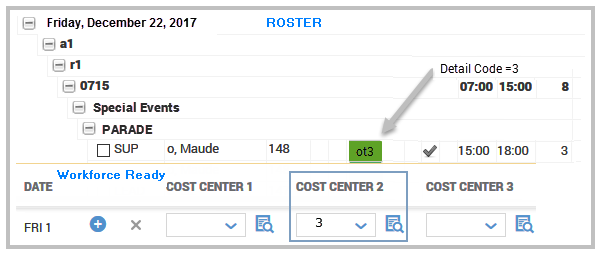
EXAMPLE 1:Suppose in this use case, you found that employees working a special event are given a work code time entry with a ‘detail code’. In which case, the detail code field could then be mapped to Cost Center 2.
EXAMPLE 2: Suppose that later on in the planning phase of the integration you found that employees can request overtime pay for a report writing task using a detail code.
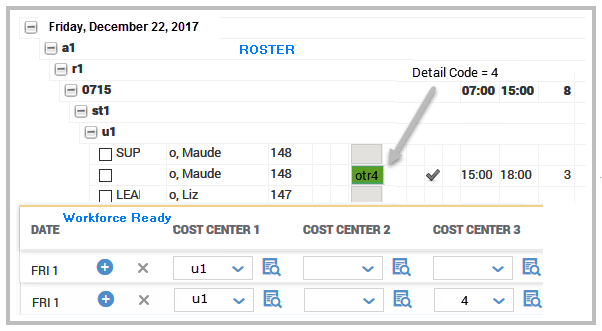
In this scenario, the employee works eight hours of regular pay in UNIT 1, stays in UNIT 1 and works two hours of overtime to finish a report that requires a detail code entry of Report Writing - which is paid through Cost Center 3. Here we have the detail code pointing to Cost Center 3, whereas in the previous scenario the detail code pointed to Cost Center 2.
In either case, the detail code can only belong to one cost center. You will need to explore and choose any of the remaining thirty-five fields to reference and pair the detail code to Cost Center 2 or Cost Center 3.
In the image below, the detail code field was paired with Cost Center 3. Note Cost Center 1 was referenced twice by Unit 1 in the export to correctly show each time entry record and associated cost center.
Other Considerations
The Roster located in this application includes information that will require special consideration and cost center placement in Workforce Ready; features such as Off Roster, Unassigned, and Suppress Positions must be evaluated. If these time entry records are not mapped initially will error in the activity log and display specific Workforce Ready External ID keys you can use to map to a cost center. For example, an off-roster record’s external ID, looks like this {off}, the text off displays enclosed in french brackets {}, an unassigned record looks like this {una}, the text una displays enclosed in french brackets, and a suppressed position varies and dependent on the position’s abbreviation but always prefaced with a period, so a Lead position with the abbreviation of ‘Le’ looks like this: {.Le}, the text .Le is enclosed in french brackets.